 ExpensO
The private expense organiser: encrypted, on-device, no account, no tracking.
Know exactly where your money goes — without handing it to anyone else.
Track every rupee. Understand every flow. ExpensO runs entirely on your phone — no servers, no third-party tracking — turning your income and spending into visually clean, interactive reports that give a self-explanatory view of how your money flows.
Most budgeting apps run on someone else's server. That costs you more than you're told.
Your transactions, balances and payees get uploaded, aggregated, and often monetised — and you rarely get to opt out of what that actually costs you.
Privacy
A complete, queryable picture of your spending sits on someone else's infrastructure — exposed to breaches, subpoenas, policy changes, and ad-targeting.
Availability
Lose signal, let a subscription lapse, or have the service shut down, and you lose access to your own financial history.
Lock-in
Your data lives in their schema, exportable only on their terms — if it's exportable at all.
ExpensO removes the backend entirely. Your whole ledger lives encrypted on your own device — the source of truth, not a cache. Using more than one device? They sync directly to each other over your Wi-Fi, or through an encrypted log kept in your own Google Drive. There is no ExpensO server to breach, subpoena, or shut down.
Six things that are true about ExpensO and almost nothing else in this category.
Private by construction
Your ledger never leaves your phone unless you choose to sync it — and even then it's ciphertext only, in your own Google Drive. There is no ExpensO server. There is nothing to breach.
Reports that explain, not just tabulate
A Sankey diagram traces every rupee from income to category to surplus, a treemap shows where it went at a glance, and seven more report types dig deeper into the same month.
Nothing is watching you spend
No analytics SDK, no crash reporter, no telemetry of any kind — the developer sees nothing. The only third party that ever runs is an ad SDK, on the free tier only, and only after you say yes.
Locked behind your fingerprint
Biometric app lock and screenshot-blocked financial screens are on by default — your data is encrypted either way, this just keeps it off your app switcher and out of stray screenshots.
Goals, not just tracking
Budgets with rollover and hard caps, savings goals with real pacing, and reports that explain the "why" — not just a list of debits.
Nothing you can't take with you
Every entry, budget and report exports to CSV or PDF, in full, whenever you want. Stop using ExpensO tomorrow and your financial history leaves with you — not locked in someone else's format.
Seven ways ExpensO does the thinking so you don't have to.
Every screen below is a real screenshot of the running app — light theme and dark theme both included, because ExpensO ships four distinct looks, not one.
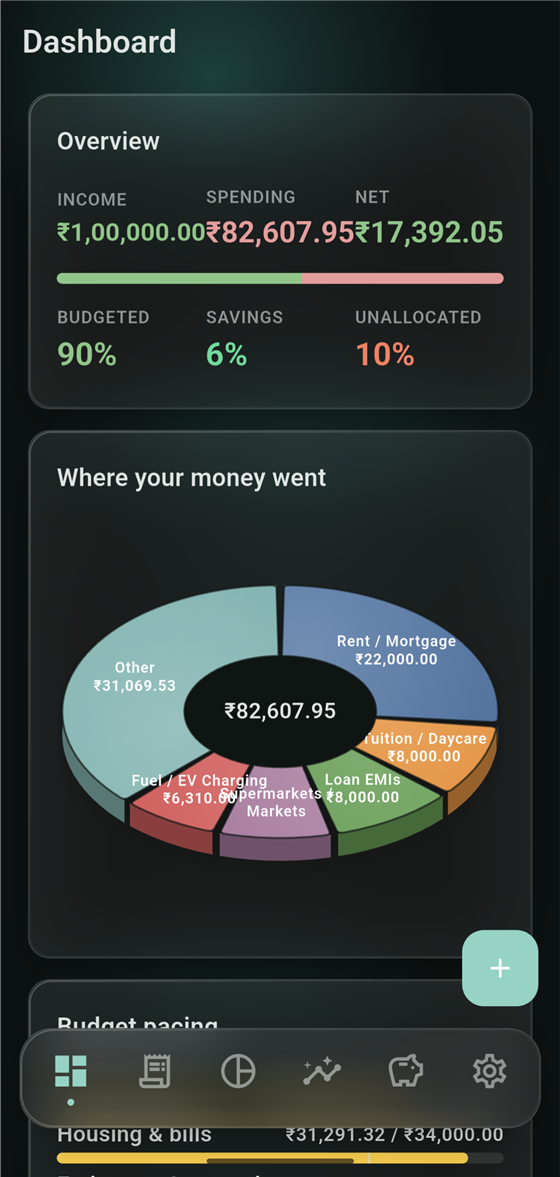
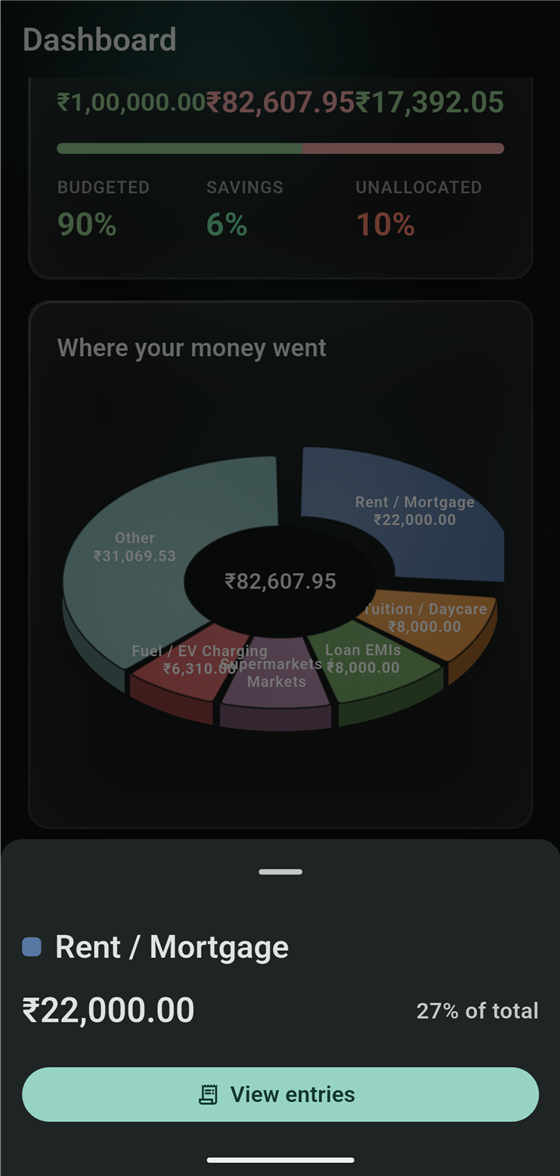
01 — DASHBOARD The whole month, in one glance
- Income, spending and net for the month, at the top — no digging.
- Budgeted, Savings and Unallocated shown as three honest, independent numbers — not one misleading "savings rate."
- A live donut of exactly where the money went — tap any slice to see the entries behind it.
- Tap any figure for its exact value — handy the moment a number gets long.
02 — REPORTS Numbers that actually explain themselves
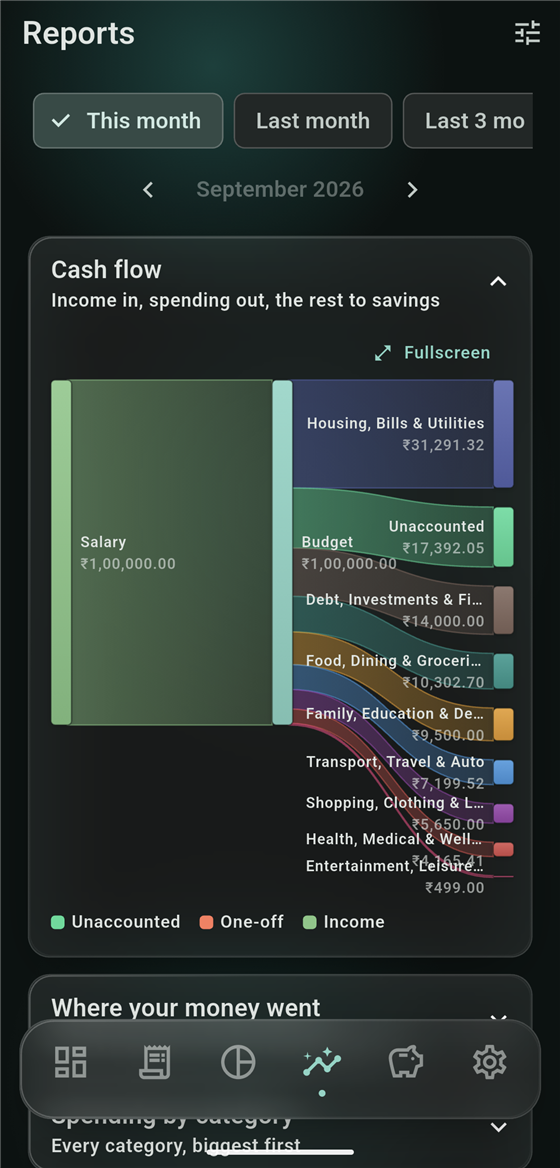
- Cash flow — a Sankey diagram: salary and interest flowing in, every category flowing out, the surplus flowing to "Unaccounted."
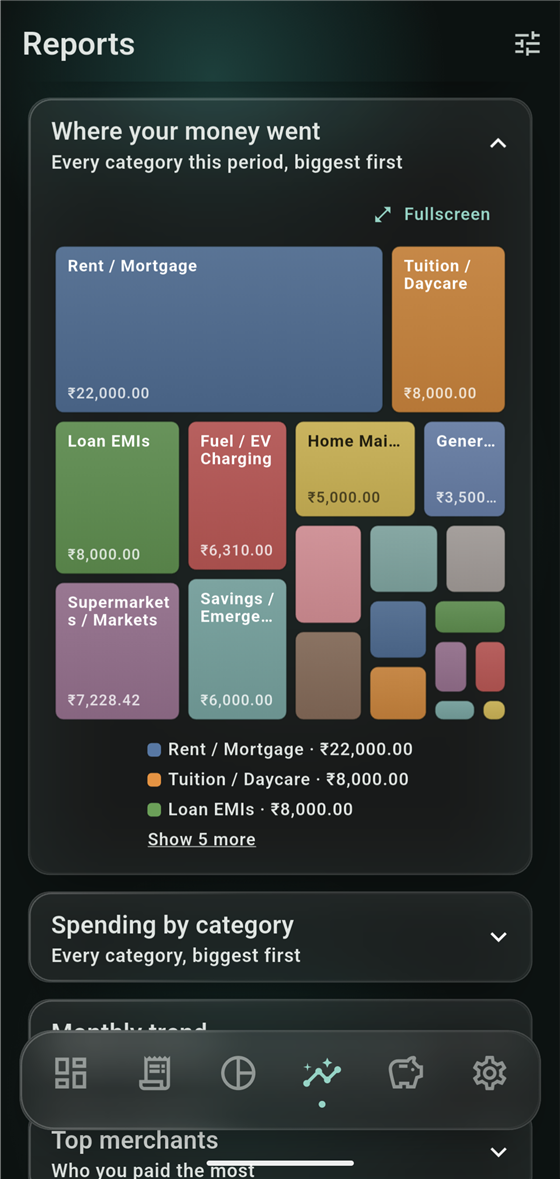
- Where your money went — a treemap sized by spend, and a ranked category list beside it.
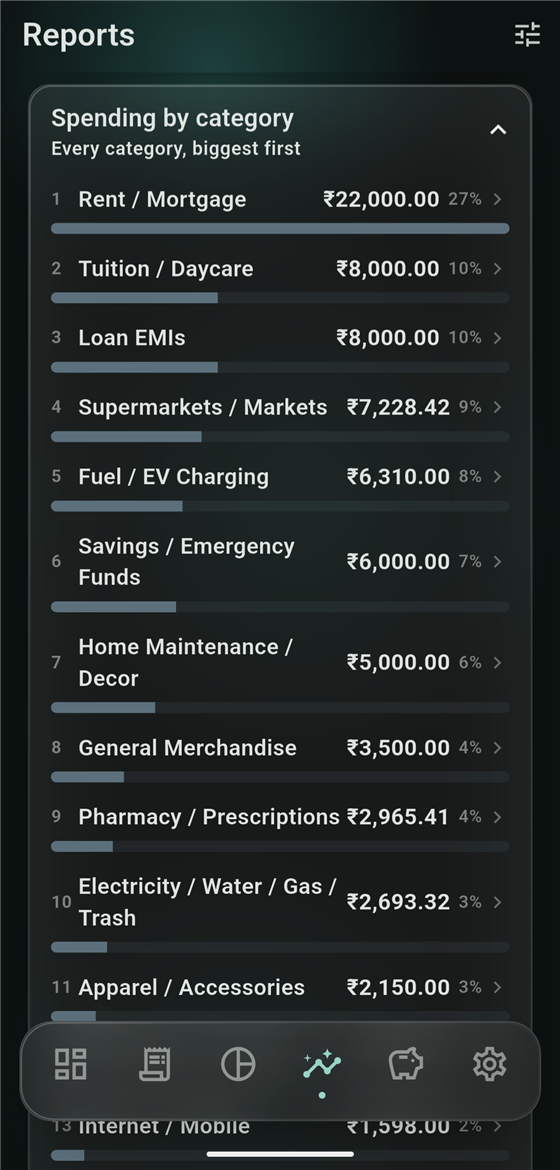
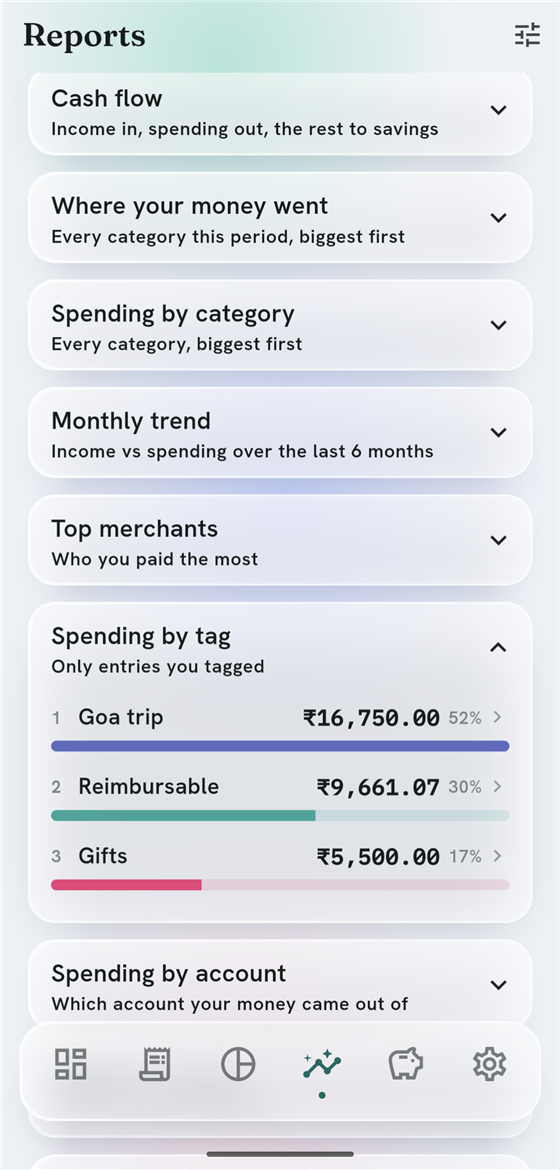
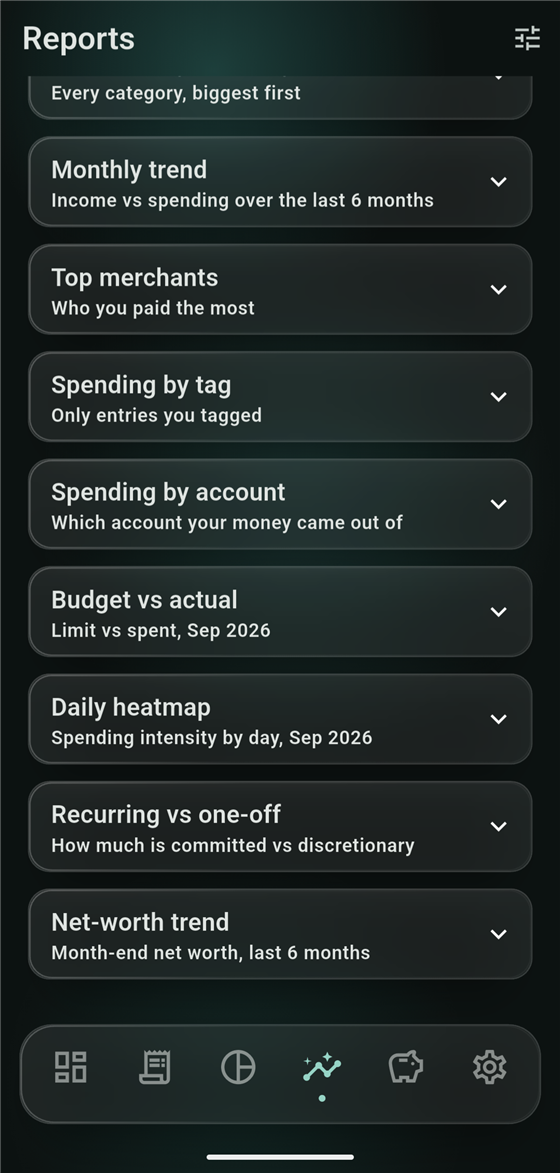
- Monthly trend, top merchants, spending by tag, by account, budget vs. actual, a daily heatmap, recurring vs. one-off, and net-worth trend.
- Every report opens fullscreen and pinch-zooms — built for a real screen, not a squint.
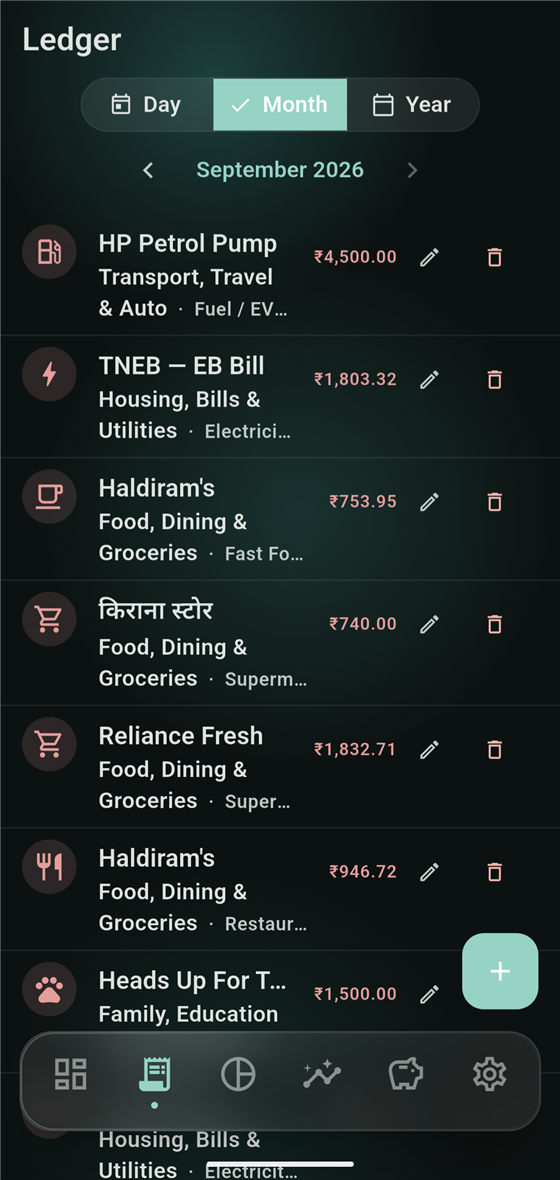
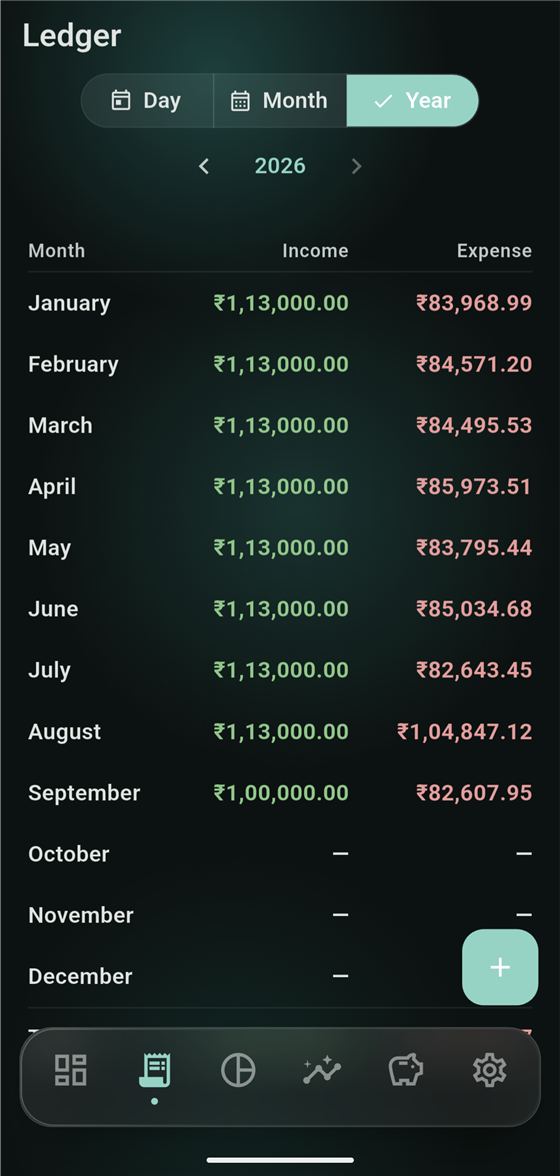
03 — LEDGER Every entry, three ways to look at it
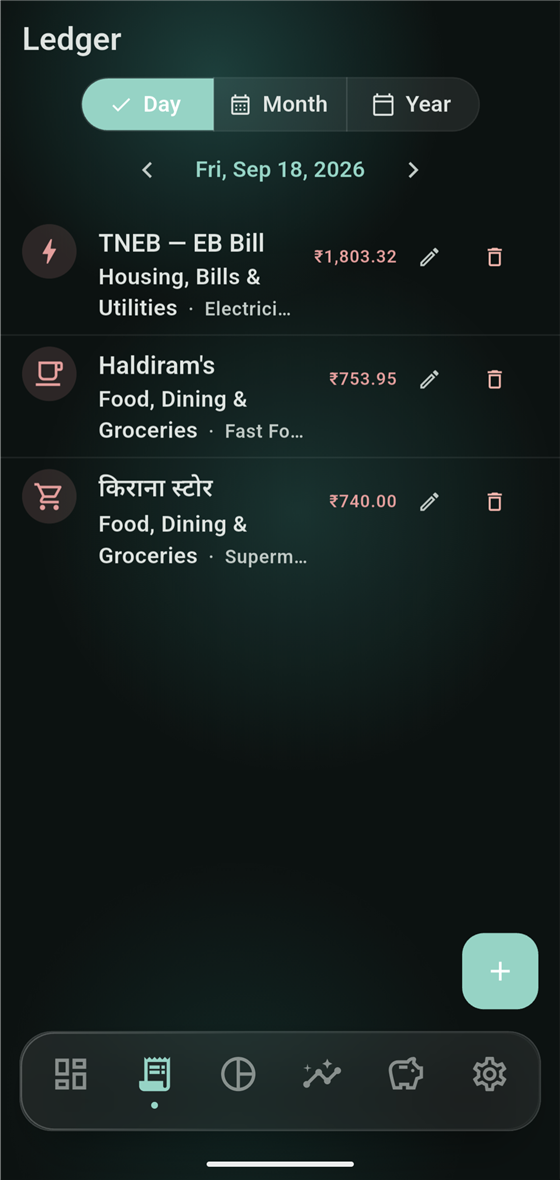
- Day view for a single day, Month for the running list, Year for a month-by-month income/expense table.
- Genuine multi-script support — log a payee in Hindi, Tamil, Arabic, or any script your keyboard offers.
- Every row shows its category and sub-category — edit or delete inline, no extra screen.
04 — QUICK ENTRY Log it before you forget it
- A calculator-style amount field — never the system numeric keyboard, never a typo in the amount.
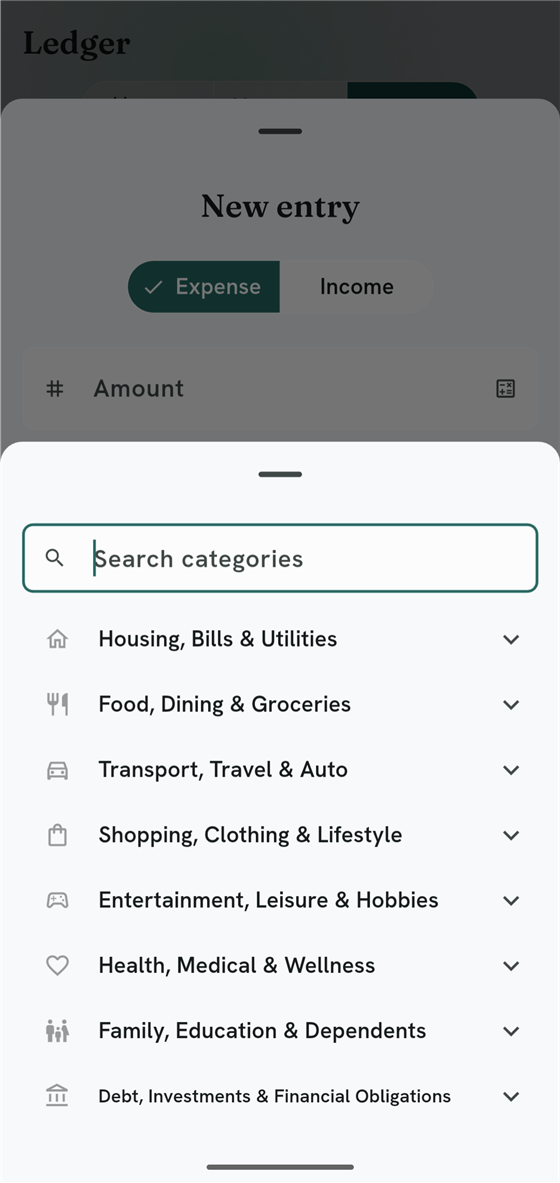
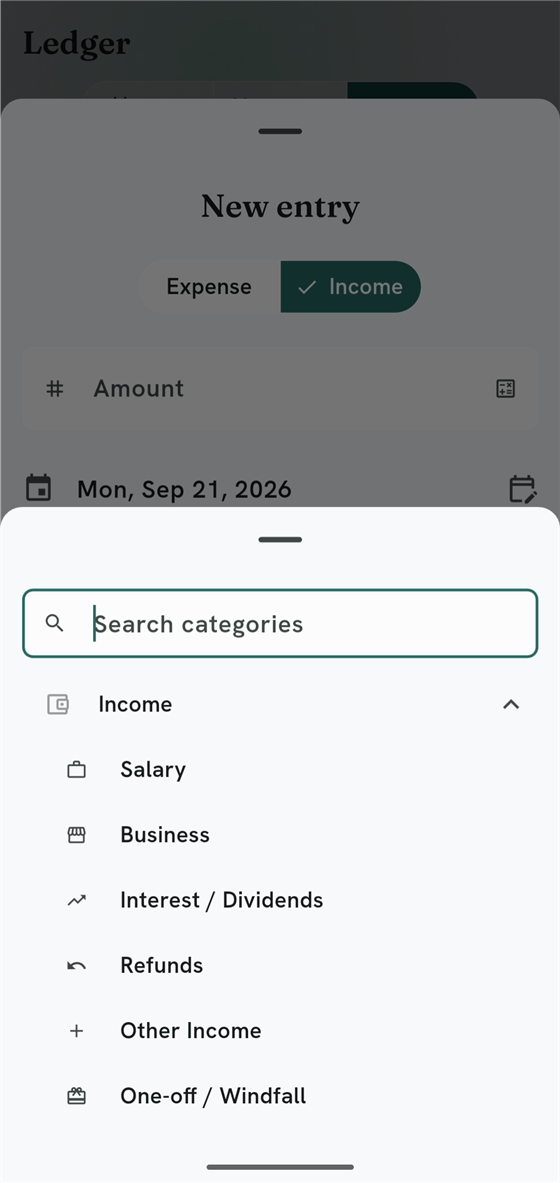
- Categories load collapsed so the list stays short — search reveals a match instantly, wherever it's nested.
- One toggle between Expense and Income, same screen.
- If a category has more than one budget (see Envelope budgets below), you're asked which one this entry belongs to — right here, not later.
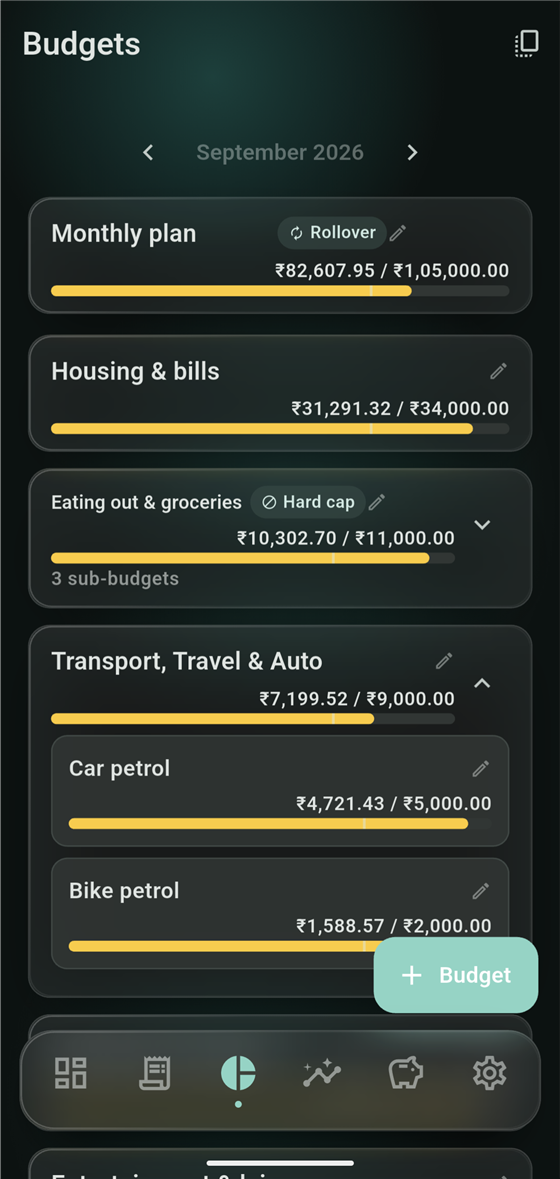
05 — BUDGETS Every rupee has a job
- Rollover budgets carry unspent money into next month automatically.
- Hard caps warn you before an entry would breach the limit.
- Nest sub-budgets under a parent — "Transport" as a whole, "Fuel" tracked underneath it.
- Envelope budgets — need Bike petrol and Car petrol tracked separately, even though both are "Fuel"? Give the category two budgets. Each one paces independently.
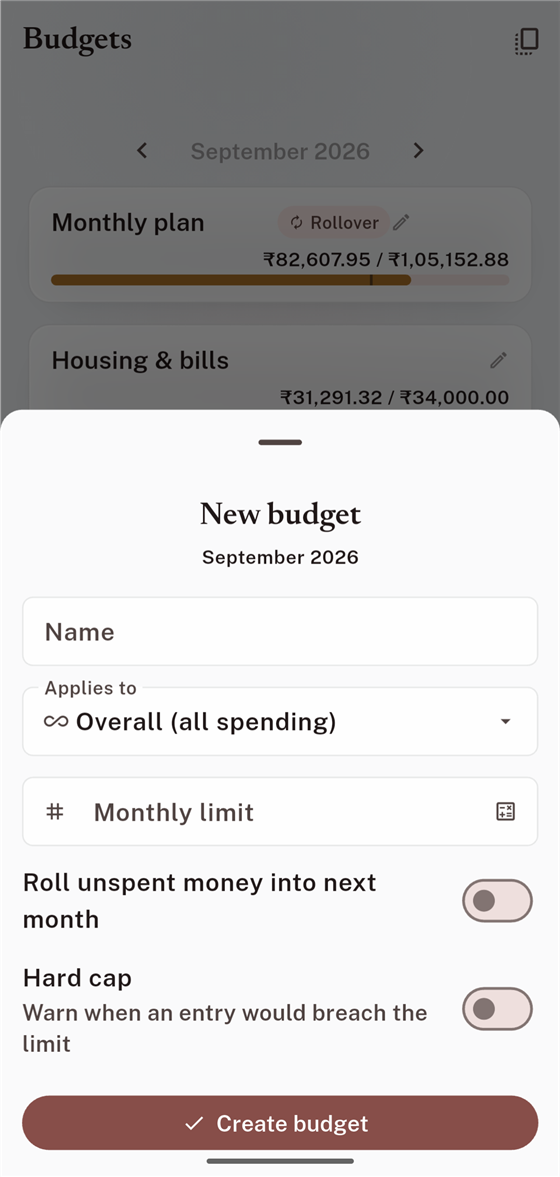
Creating a budget takes one sheet — name, category, monthly limit, rollover and hard-cap switches:
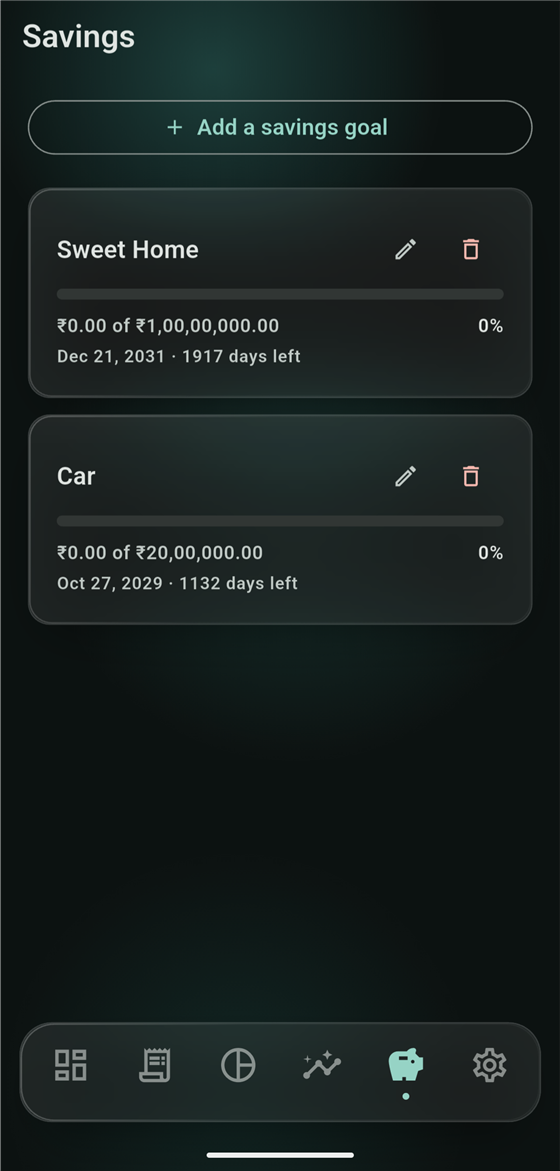
06 — SAVINGS GOALS Give your money a destination
- As many goals as you want — a home, a car, an emergency fund.
- Set a target amount and a target date — see the days remaining and the percentage there, always current.
- Pairs naturally with a "Savings" budget category, so the Dashboard's Savings% reflects money you actually moved, not a guess.
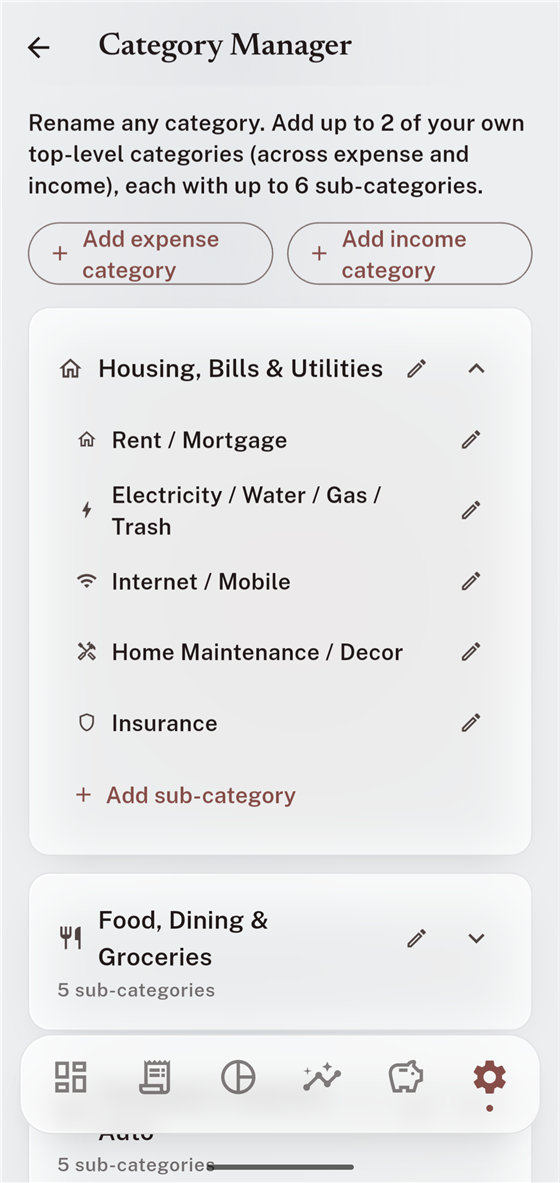
07 — MAKE IT YOURS Categories, accounts, and four ways it looks
- Rename any category, and add up to two of your own top-level ones — each with up to six sub-categories.
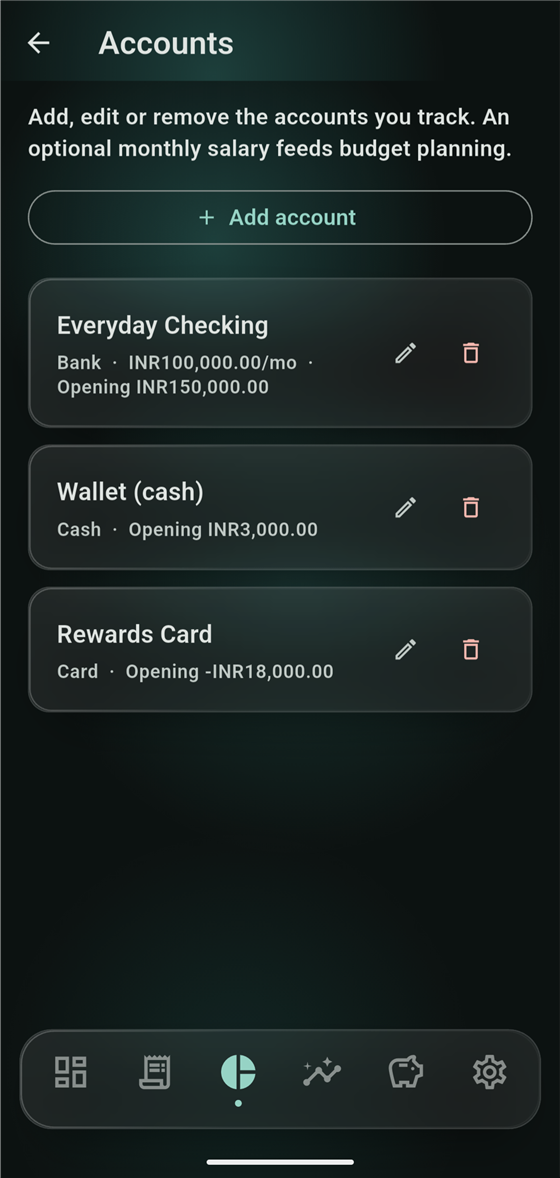
- Track bank, cash and card accounts side by side, each with its own opening balance.
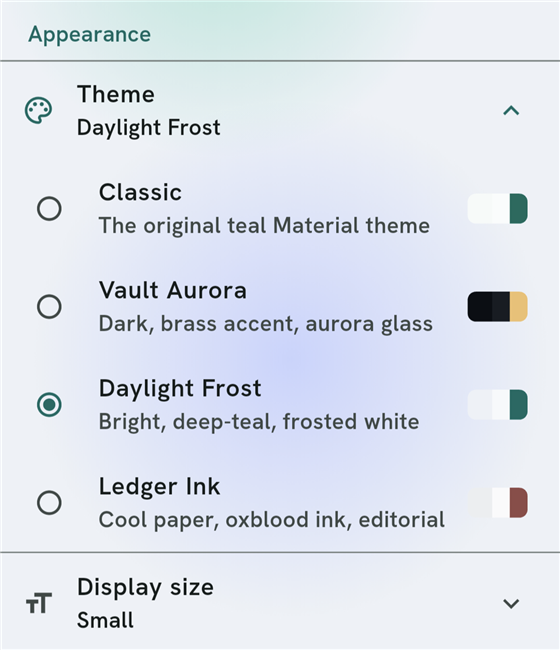
- Four full themes — Classic, Vault Aurora, Daylight Frost, Ledger Ink — plus adjustable text size.
See exactly what you're getting — the same depth that's built into the app itself.
This is the manual, not the pitch — practical, in order, written for the first time you actually sit down and set this up.
1 Setting up your accounts
Open Budgets → Accounts (or you'll be prompted the first time you add an entry). Add one account per real place your money sits — a bank account, a wallet of cash, a credit card. For each one, set:
What to fill in
- Type — Bank, Cash, or Card. This only affects grouping in reports, not behaviour.
- Opening balance — what's in it right now. For a credit card, enter the current balance owed as a negative number.
- Monthly salary (optional, bank accounts only) — feeds the Dashboard's Budgeted/Savings/Unallocated split. Skip it if income is irregular; log it as entries instead.
You can add, rename, or delete accounts any time from the same screen — deleting an account keeps its historical entries in the Ledger, it just stops appearing as a destination for new ones.
2 Building your category tree
ExpensO ships with eight expense categories and one income category already built for an Indian household — Housing, Food, Transport, Shopping, Entertainment, Health, Family & Education, and Debt & Investments — each with five ready-made sub-categories (Rent, EB bill, Fuel, Tuition, Loan EMIs, and so on).
Making it yours
- Go to Settings → Category Manager.
- Tap the pencil on any category or sub-category to rename it in place — your historical entries update to match automatically.
- Need something that doesn't exist yet? You can add up to two of your own top-level categories (across expense and income combined), each with up to six sub-categories of your own.
Category ids are stable once created — renaming is instant and safe, but plan your two custom top-level slots deliberately, since they're the two you get.
3 Logging your first entries
Tap the + button from Dashboard or Ledger. Choose Expense or Income at the top — everything below adapts to that choice.
Step by step
- Tap the amount field — a calculator sheet opens. Type the amount and confirm; the system keyboard is never used for money, so there's no risk of a stray decimal.
- Pick a category. The list loads fully collapsed for a clean first look — tap a parent's chevron to expand it, or just start typing in Search to jump straight to a match, expanded or not.
- Pick the account the money moved through.
- If that category currently has more than one active budget (see Envelope budgets), you'll be asked which one this entry counts against — this is the only extra step, and only when it's genuinely ambiguous.
- Optionally add a payee, a note, or a #tag (tags power the "Spending by tag" report — useful for a trip, a project, or anything reimbursable).
- Save. The entry appears immediately in the Ledger and folds into every Dashboard number and report.
To edit or delete later: find the entry in the Ledger and use the pencil or trash icon on its row.
4 Reading the Dashboard
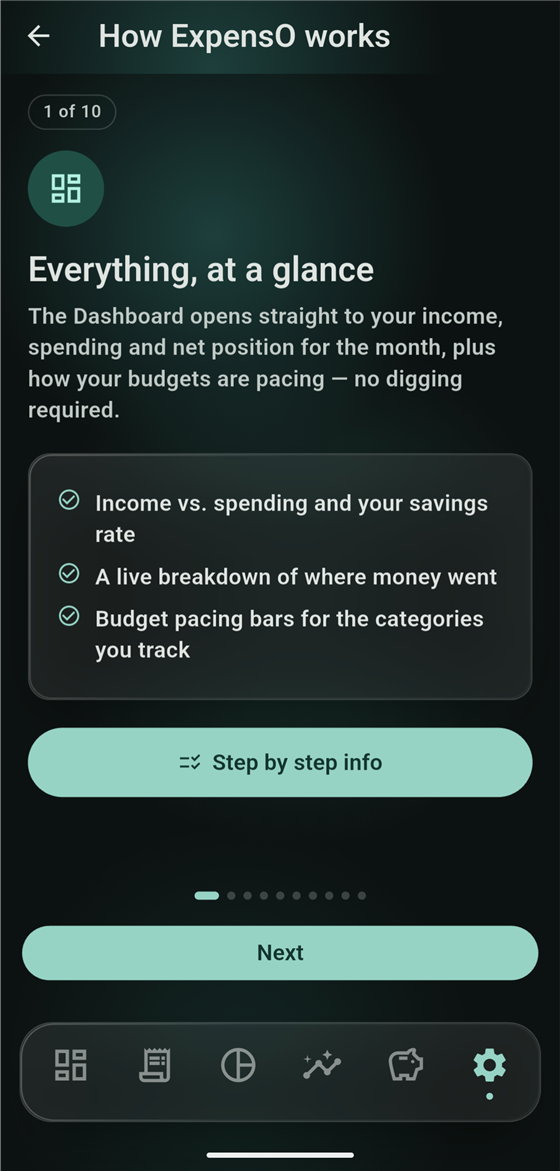
The Dashboard is deliberately the very first screen — everything on it is scoped to the current month.
What each number means
- Income / Spending / Net — total money in, total money out, and the difference. Tap any of the three for its exact value.
- Budgeted — the share of this month's income already covered by a budget cap somewhere. Not the same as spent — a category can be "budgeted" even before a rupee of it is spent.
- Savings — the share of income actually booked under a Savings-flagged category this month. Zero until you log something there — it will never show a number you haven't earned.
- Unallocated — the rest: income with no budget claim on it yet. Not a bad number — just an honest one.
- Where your money went — a donut of this month's spend by category. Tap any slice to see the exact amount, its share of total, and a button straight into the filtered entry list.
5 The Ledger — Day, Month, Year
Three views of the same data, switched with the toggle at the top:
- Day — every entry on one specific date. Best for "what did I actually spend today."
- Month — a running list for the month, newest first. This is where you'll spend most of your time.
- Year — a twelve-row table, income and expense per month, for a year-at-a-glance view (and the source for the Net-worth and Monthly-trend reports).
Use the arrows either side of the date/month/year label to move back and forward — there's no limit on how far back you can browse.
6 Creating and managing budgets
Open Budgets and tap + Budget.
Step by step
- Give it a name (optional — leave it blank and ExpensO falls back to the category's own name).
- Applies to — pick a category, a sub-category, or "Overall (all spending)" for a single whole-wallet cap.
- Set the monthly limit.
- Roll unspent money into next month — turn this on for categories where under-spending should build up a cushion (an annual insurance premium you're saving toward, for instance).
- Hard cap — turn this on to get warned before an entry would push you over the limit, rather than finding out after the fact.
A category can hold a parent-level budget and its own sub-category budgets at the same time — the sub-budgets nest visually underneath, and the Dashboard's "Budgeted" figure counts each rupee only once.
Every month is editable going forward, plus the current month and the two months before it — older months stay locked as a clean historical record. Use Copy previous month (top-right) to carry last month's limits forward as this month's explicit values in one tap.
7 Envelope budgets — two caps, one category
Sometimes one category genuinely covers two things you want to track separately — bike petrol and car petrol are both "Fuel," but you'd like to know each on its own terms. ExpensO's answer: create two budgets on the same category.
How it behaves
- Create the first budget as usual — name it something specific, like "Bike petrol" — applied to the Fuel category.
- Create a second budget, also applied to Fuel, named "Car petrol."
- From now on, every new entry under Fuel asks which of the two it belongs to.
- Each envelope paces independently — its own progress bar, its own remaining amount, its own rollover and hard-cap settings.
Entries logged before the second envelope existed (or from an older version of the app) aren't forced to guess — their spend is split between the envelopes in proportion to each one's limit, so historical totals still add up correctly.
8 Making sense of Reports
Open Reports and choose a period at the top (This month, Last month, Last 3/6 months, This year, or a custom range). Every card below updates to that period.
The nine report types
- Cash flow — a Sankey diagram: every income source flowing in on the left, every category flowing out on the right, with the surplus flowing to "Unaccounted."
- Where your money went — a treemap, area sized by spend, for a shape-based read on the month.
- Spending by category — a ranked, numbered list, biggest first.
- Monthly trend — income vs. spending as a line, over the last six months.
- Top merchants — who you paid the most, by payee name.
- Spending by tag — only the entries you tagged, grouped by tag — perfect for isolating a trip or a project.
- Spending by account — which account the money actually came out of.
- Budget vs. actual — limit against spent, for every budget, side by side.
- Daily heatmap, Recurring vs. one-off, and Net-worth trend round out the set for anyone who wants to go further.
Tap "Fullscreen" on the Cash flow or treemap card to pinch-zoom — both are built to be read on a real screen, not squinted at in a small card.
9 Setting a savings goal
Open Savings → Add a savings goal.
- Name the goal — "Sweet Home," "Car," "Emergency fund," whatever it actually is.
- Set a target amount and a target date.
- ExpensO shows the amount saved so far, the percentage complete, and the days remaining — recalculated every time you open the screen.
A goal doesn't move money on its own — pair it with a budget under a Savings-flagged category (or your own custom "Savings" category) so the amount you actually log there is what counts toward it, and toward the Dashboard's Savings% figure.
10 Personalizing — themes, text size, and security
Open Settings → Appearance.
- Theme — Classic (the original teal Material look), Vault Aurora (dark, brass accents), Daylight Frost (bright, frosted white), or Ledger Ink (cool paper, oxblood, editorial serif). Switch any time — nothing about your data changes.
- Display size — scales text and spacing app-wide, independent of your phone's own system text size.
Under Settings → Security: turn on Biometric app lock to require your fingerprint, face, or device PIN every time ExpensO opens. Your data is encrypted on-device either way — this adds a lock on the door on top of that. Financial screens are also screenshot-blocked by default, so they never appear in your recent-apps thumbnail or in an accidental screenshot.
See the app pre-loaded with sample data.
A synthetic JSON + CSV export — accounts, categories, budgets, savings goals and months of transactions — written in the same format as ExpensO's own "Export everything" feature. Import it from Settings to explore every screen without entering anything yourself.
How your data is actually protected.
Not a promise — a description of what the code does. Every claim below is enforced by the app itself, not a policy someone could quietly stop following.
Encrypted at rest, always
Your ledger is stored in an encrypted local database from the moment the app is installed — not an optional setting.
Biometric-bound, not just PIN-gated
The app-lock key itself is bound to your device's secure hardware and only released after a fresh biometric check — not a password ExpensO stores and compares.
No first-party analytics, ever
No crash reporter, no usage analytics, no telemetry of any kind ships in ExpensO. The developer does not know how you use the app.
Card numbers are actively refused
A built-in guard checks every free-text field the moment it would reach storage, and blocks anything that looks like a card or CVV number — it should never be there in the first place.
Screenshot-blocked by default
Financial screens carry a system flag that keeps them out of your recent-apps thumbnail and blocks screenshots, on by default.
Sync, if you want it, on your terms
Optional cloud sync writes only ciphertext to a private folder in your own Google Drive — never to a server ExpensO operates, because none exists.
Your money. Your phone. Nobody else's business.
Built and maintained by a solo developer in India, for the way money actually moves here — not adapted from somewhere else.